Facilitating a Weavly Coding Workshop (Beginners)
Introduction to coding
To begin, give an understanding of what coding is and how it is used in the learners’ life. This introduction will help provide context of what the Weavly coding environment can offer.
A script to say to learners:
We use coding to talk to computers. To make sure they do exactly what we want, we have to give them clear step by step instructions. There are so many different kinds of computers around us and we constantly give them different instructions.
Offer examples using familiar devices that have a computer and use coding, such as elevators, microwaves, washing machines, etc. Facilitators can show several different image pairings to learners and ask them to identify which ones have a computer and need clear instructions to work.
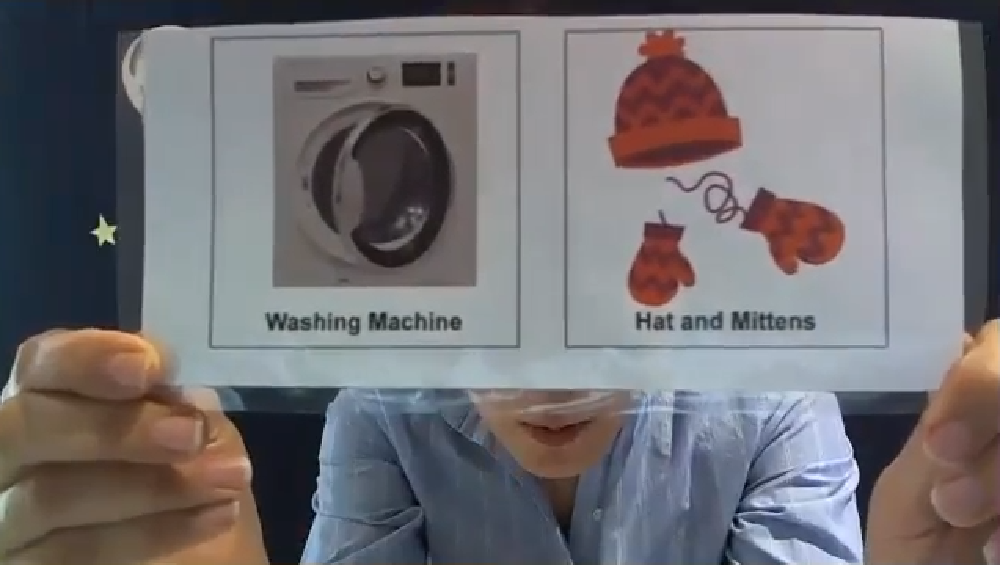
A script to say to learners:
Think about microwaves. You can use different options to adjust time and intensity on a microwave to make it heat up your food the way you want it. Then, once you press the start button, it follows your instructions and heats up your food exactly the way you want it.
Weavly demo
Foundational skills
Before starting to use Weavly, there are some foundational skills that learners will need. If they don’t have experience with these concepts, it is suggested that you create activities to either build the background knowledge or help learners connect with what they already know. These concepts can be covered as different parts of Weavly are introduced.
The skills would be:
- Understanding and an ability to express relative directions (forward, backward, left and right on their own body, and on an object in different orientations to their body)
- Understanding the difference between a 45 and 90 degree turn
- Understanding a sequence
- Understanding repeated patterns
- Understanding co-ordinates (for some users)
We have developed several unplugged activities that can help you anchor these foundational skills. Please visit the Unplugged Activities section for more details.
Coding environment overview
Provide an overview of the Weavly user interface to help orient learners before they start building a program. As you describe each part, highlight that section in the Weavly coding environment.
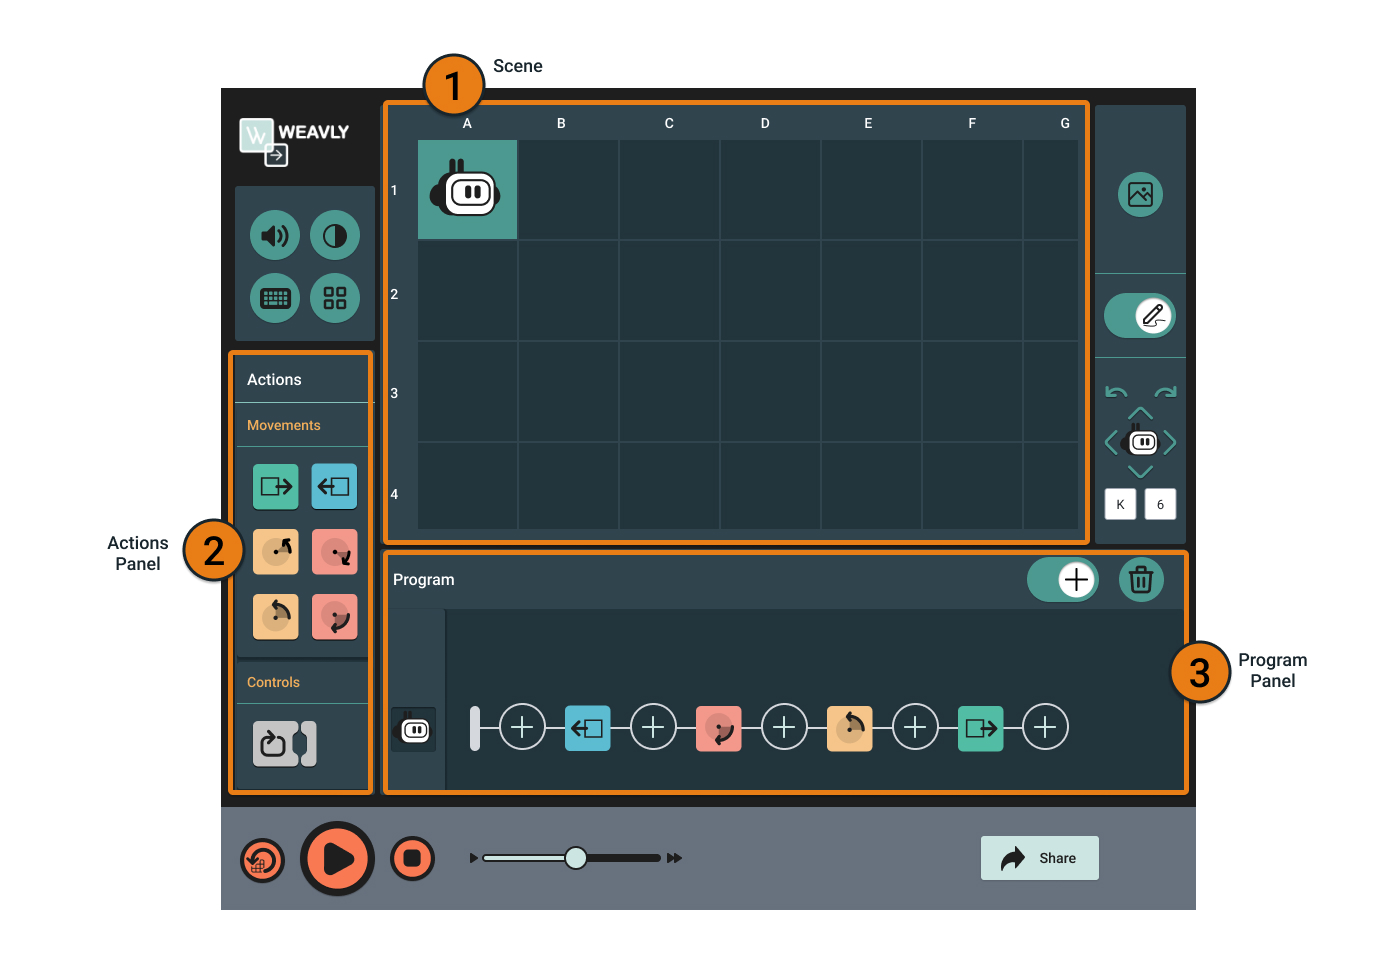
A script to say to learners:
This program has 3 main parts. These three parts work together to help you build a program. With a program you can move your character on the screen.
- The first part is the scene where you can see your character move.
- The second part is the actions panel that gives you different action blocks like forward, backward, turn right or turn left.
- The third part is the program panel that gives you a place to put together those different action blocks and build a program to move your character on the scene.
Screen reader users can use heading or landmark navigation to go to any of these sections. Keyboard users can use the ‘Tab’ key to move to these sections.
Customizing the environment
Before the learners begin to build a program, encourage them to try different accessibility options to set up an environment that they prefer and enjoy using. There are visual themes that change the colour scheme of Weavly and audio settings that can adjust how sounds are incorporated.
For screen reader users: The audio feature is recommended to be turned off.
As you talk about each menu, try different options on your screen to show learners how they affect Weavly.
Visual themes

A script to say to learners:
You have a few colour options for Weavly. Give each option a try and decide on one that you would like. You can always go back here and change your selection.
Audio settings
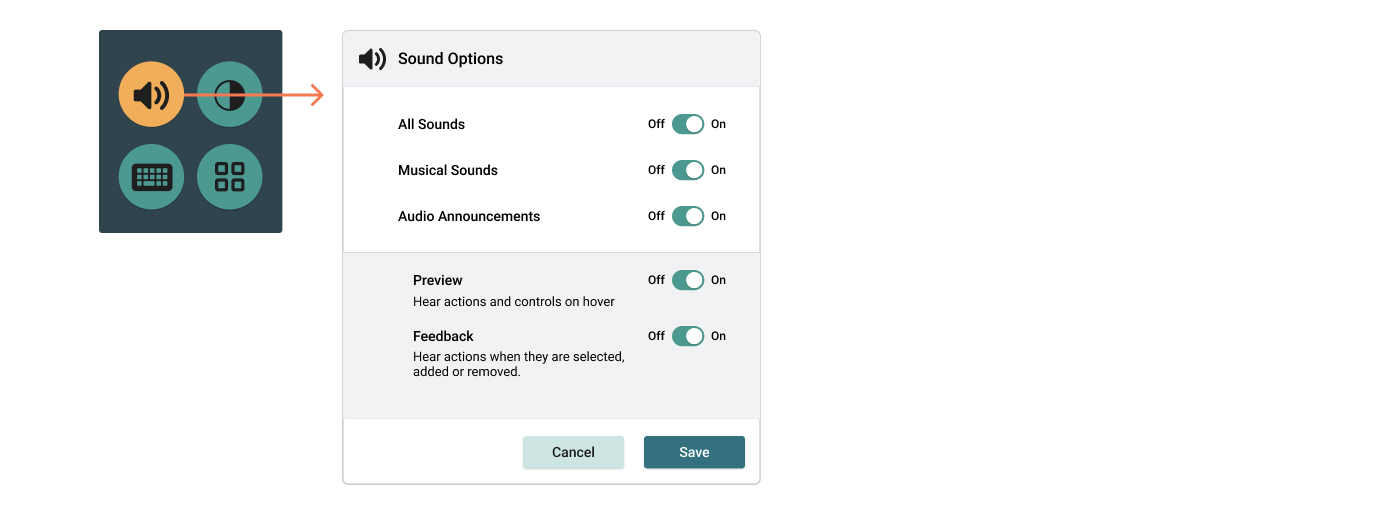
You can choose to turn on/off different sounds in Weavly. Give the toggle a try and decide if you would like to keep this on or off. You can always come back here and turn this feature on/off.
Scene background selector
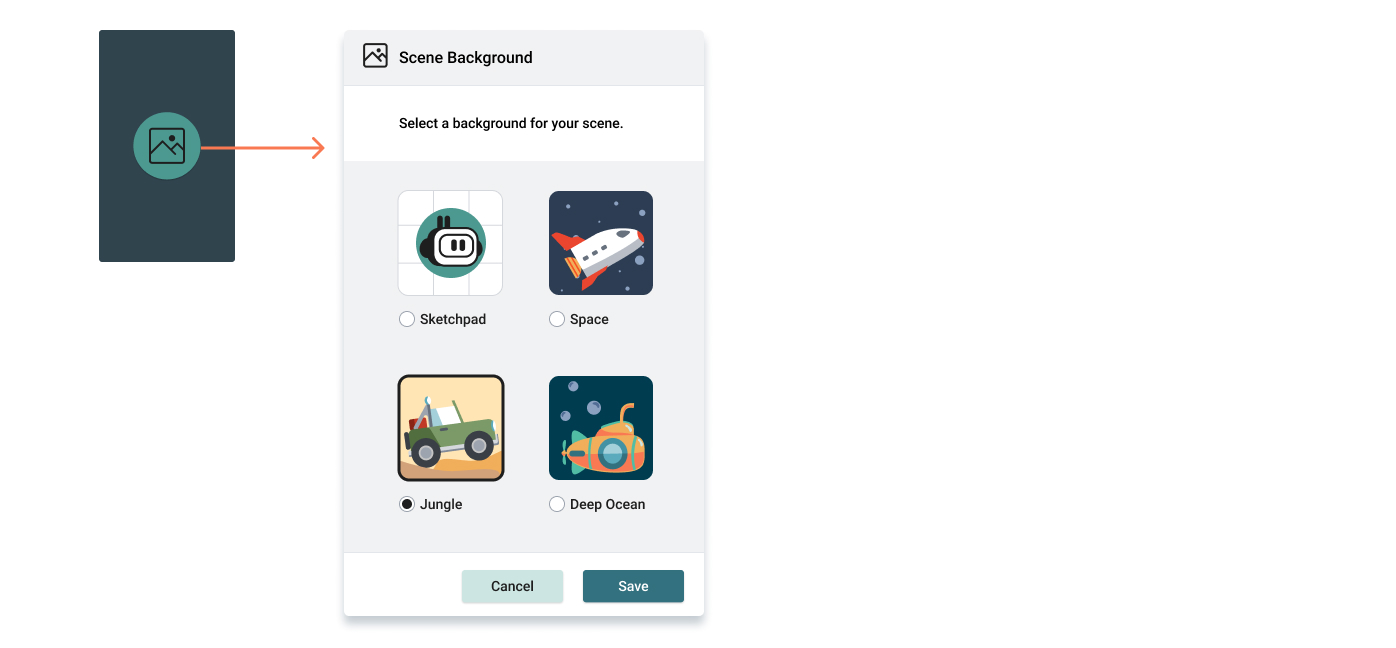
You can also pick different backgrounds for your scene. Choose the Scene background selector button and try to select the one you would like.
Play area
Scene
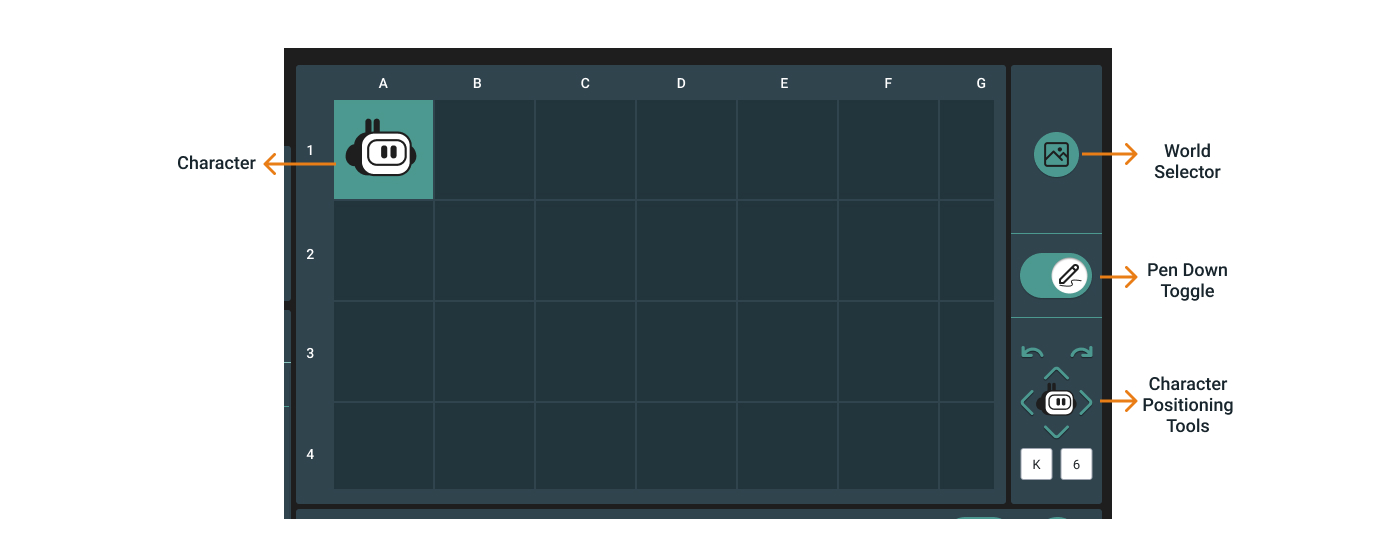
The scene includes a grid of 12 columns and 8 rows. The grid layout supports learners to locate their character on the scene. This information can also help with planning a path towards a specific grid cell as learners build a program.
As your character moves around the scene, a line can be drawn when the Pen Down toggle (located in the right side of scene) is turned on. The Pen Down toggle helps learners to focus their attention on tracking the movement of the character along with the program they have built. The feature also allows learners to draw a picture when they have selected the Sketchpad background.
Depending on the learner’s experiences with co-ordinates, facilitators can have have learners practice naming the co-ordinate found at specific locations. Likewise, educators could ask them to identify what they see at a specific co-ordinate. This activity will help facilitators to explicitly teach and practice the word co-ordinate.
A script to say to learners:
The “Scene” is where your character gets to move and play. This scene is made of a grid that has 12 columns and 8 rows. The columns are labelled by alphabet letters from A-L and the rows are numbered 1-8. In your scene, you have a character. Right now, it is on the top left corner of your grid – on Column A, Row 2. We call its location as A-2. Your character looks like a Robot right now.
Actions panel
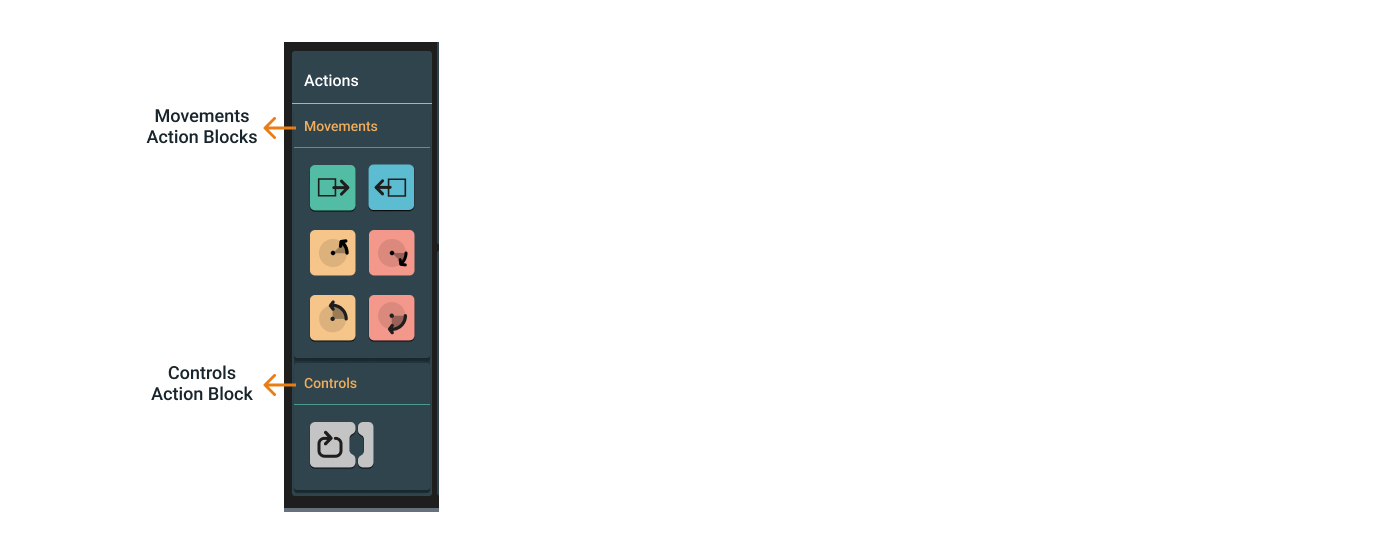
Currently, there are two different types of action blocks available on Weavly.
Movements
The first type of action blocks can be used to make your character move. They include:
- Moving forward by 1 square
- Moving backward by 1 square
- Turning right by 45 degrees
- Turning right by 90 degrees
- Turning left by 45 degrees
- Turning left by 90 degrees
Controls
The second type of action blocks are controls. These controls give conditions to change how action blocks behave. Currently there is only the loop feature available under the control blocks that can be further explored in the Facilitation Guide for Advanced/Experienced Coders.
Learners can select one action block at a time and then add it to their program to build a sequence of actions.
A script to say to learners:
These actions are the building blocks for creating a program. You can think of the action panel as a fridge. If you want to make a program salad, you should come to this fridge and get any ingredients you need. There are different groups of action blocks to choose from. Here are the available actions blocks on Weavly:
- An action block for moving your character Forward one square
- An action block for moving your character backward one square
- An action block for turning your character Right 45 degrees (This option helps you draw diagonal lines)
- An action block for turning your character Right 90 degrees
- An action block for turning your character Left 45 degrees (This option helps you draw diagonal lines)
- An action block for turning your character Left 90 degrees
- An action block to build loops (This option helps you repeat a part of your program)
How to build a program
Here is a step by step instruction to build a sample program with the available action blocks in the Weavly coding environment. There are two ways that learners can build a sequence of action blocks in the program panel:
- Drag an action block and drop it to a specific ‘+’ button on the program sequence.
- Select an action block and then selecting an ‘+’ button on their program sequence
In this example, we are going to build program to make our character draw a square on the scene.
A script to say to learners:
Here is where you make your program. Once you get your ingredients from the action panel, you bring them here and add them in a sequence to make your program salad.
You can add an action to your program in two ways. You can drag them from actions and drop them where you want it in your program. Or you can select an action in the actions panel and then select any of the “+” buttons to add it to your program.
How to play your program
The play controls (bottom) includes buttons to play, pause, or stop the program. There are options to adjust the program playback speed and to refresh the scene.
Once learners are ready to try their program, press the “Play” button to make their character move based on the program they have built. Make sure the Pen Down feature (toggle in the scene settings on the right side) is enabled if you want your character to draw a line as it moves on the scene according to your program.

A script to say to learners:
Once you have added your action blocks, you can play, pause and stop your program. As your program is being played, your character will move on the scene. You also have the option to change the speed your program is playing and make it run slower or faster.
How to edit your program
As learners add action blocks to their program and play it, they may realize that their program doesn’t work the way they have planned and they may want to edit some parts of it. This process is called “debugging” in programming. Once an action block is added to a program, learners can select that action block to open up its edit menu to make changes.

On the edit menu, they have these four options:
- Delete the selected action block
- Replace the selected action block
- Move the selected action block one step to left
- Move the selected action block one step to right

Learners also have the option to select the trashcan icon on the top right corner of their program panel to delete their entire program and start over again. Please note that deleting the program does not delete any current drawings on the scene. To delete the drawings on the scene and bring the character back to its original position, learners need to press the “Refresh” button right before the Play controls.
When learners encounter unintended results (e.g. character is moving in the wrong direction), encourage them to stop and talk to them about different ways that they can “debug” their program.
A script to say to learners:
If your character is not doing what you want it to do, there are different ways that you can fix this. Programmers call this “Debugging”.
Select the action block that you think is causing the problem. An edit menu will pop up with options. On the menu, there is a “Trashcan” that you can use to delete that action block.
The second option on this edit menu is “Replace”. You can use this option to replace your current action block with a different action block. For example if your current action block is Turn Right 90 degrees, you can use the “Replace” option to switch to Turn Left 90 degrees or any other action block.
If you think the placement of your action block is in the wrong order, you can use the “Move Left” and “Move Right” buttons to move this action block along your program.
If none of these options work and you are not sure what is causing the problem, then you want to start from scratch. To start from scratch, you can delete your entire program by selecting the trash icon in your program area (located on top right corner) and then select the “Delete All” button.
How to refresh the scene
Every time a program is played, the character executes the program from its current position on the scene. For example, imagine the learner has built a simple program with one “Move forward 1 square” action block. The first time they play it, the character moves from its original spot A2 and lands on B2. The second time they play the same program, their character starts from B2 and lands in C2. If a learner wants to take their character back to its original starting position (A2), they need to press the “Refresh” button located right before the “Play” button.
A script to say to learners:
Did you notice that every time you played your program, your character continued moving from the last spot it was moved to?
If you want to take your character back to its original starting point on the scene, you need to select the “Refresh” button before playing your program.
How to share your program
Next to the Play controls (right bottom) is a button to share the created program. Once the ‘Share’ button is selected, a URL link of the built programs is copied automatically. Learners can use that link to share their work with others via email or other social platforms.
A script to say to learners:
To share the program you have built, select the ‘Share’ button in the bottom right corner to get a URL link of your program. You can share this link with your friends.
Additional resources
To ensure learners with diverse abilities can access and operate the Weavly coding environment, we have developed a series of facilitation guides to provide more details about how Weavly can respond to different needs and preferences.