Facilitating a Weavly coding workshop (Advanced users)
Weavly introduction
This facilitation guide is created for learners to further explore the advanced features of the Weavly coding environment. These features are designed for learners who have some previous experience with block-based coding environments, such as Weavly, and are familiar with programming foundational concepts. This guide is written for learners who understand how to read and use coordinates, and have an understanding of repeated patterns. Learners will need to be taught by facilitators to engage and benefit from the exploratory activities below.
If you are new to Weavly or block coding, please start with the beginner’s guide to get an overview of the Weavly coding environment and learn about how to use it to build a program.
Facilitating a Weavly coding workshop (Beginners)
How to move on a path and avoid barriers
Weavly offers several backgrounds that each include a different set of missions to complete. Here is a list of current backgrounds grouped based on their difficulty levels:

Beginner

Intermediate

Advanced
At the beginner level, facilitators can set a specific target on a background and support learners to build a short and simple program to reach that target. At this level, most targets can be reached by using basic movement action blocks, such as ‘Move Forward 1 square’ and ‘Turn Left 90 degrees’.
At the intermediate level, learners have multiple destinations that they can go to depending on their preference or specific missions. Here, they need to build programs to move their character on diagonal lines in addition to the straight lines, which requires the use of turning right or left for 45 degrees.
At the advanced level, learners need more planning and using a combination of all their action blocks including loops to build a program to reach different targets on a specific background.
Once learners choose a background, facilitators can select a specific target/grid coordinate and ask learners to build a program to move their character from its current position to the designated spot. For example, in the ‘Deep ocean’ facilitators can instruct learners to build a program to move their submarine to the sunken treasure chest on the seabed.
There are a number of different obstacles on each of these backgrounds to encourage learners to plan around them on their path to their destination. For instance, in the Deep ocean background, learners should avoid the shark as well as the jellyfish on their path to the treasure chest.
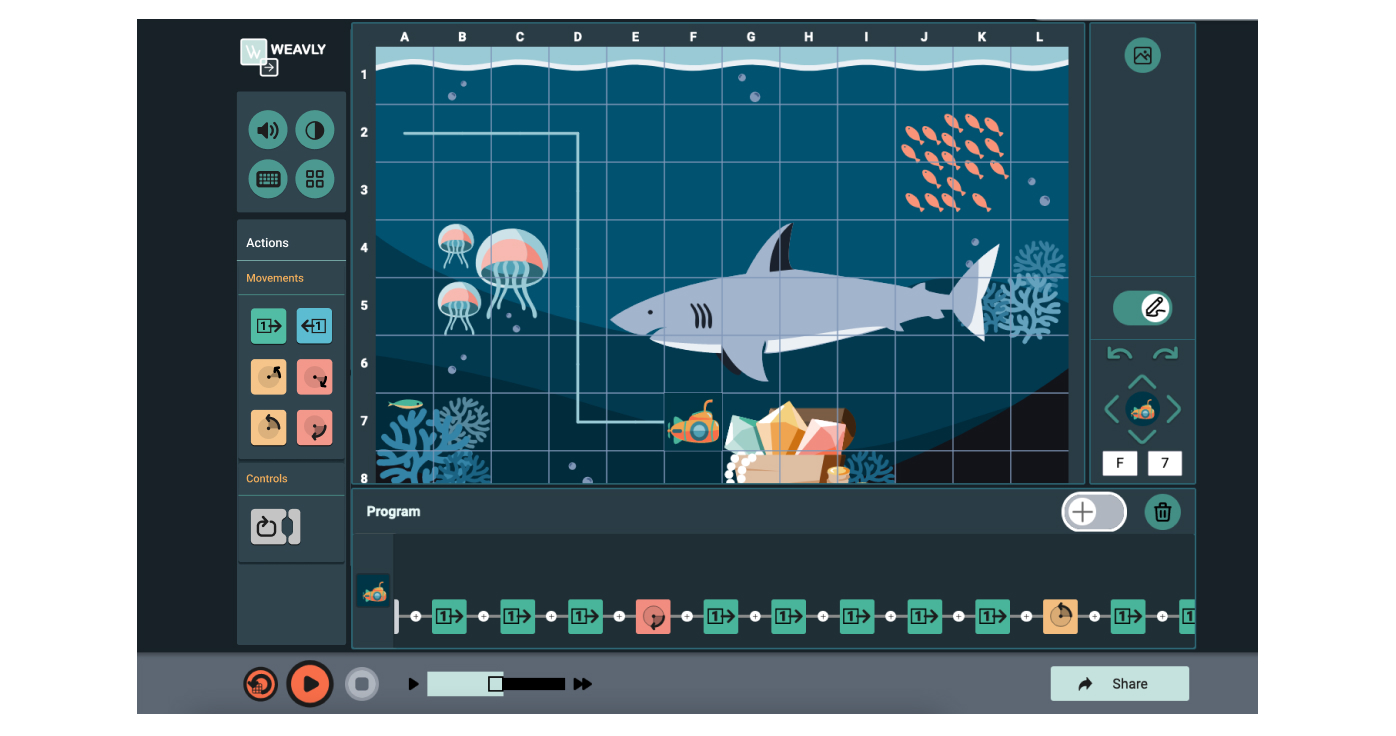
Here is an example of how to build a path on the Deep ocean background to move a submarine from A2 to the treasure chest without coming into contact with the shark or jellyfish. Please note that the treasure chest occupies several grid cells. By reaching any of those cells, learners will have accomplished their mission.
A script to say to learners:
Let’s try to get the submarine to the treasure chest. On our way, we have to avoid the shark and the jellyfish. Right now your submarine is at A2. Which path do you plan to take to get to the treasure? Which action blocks are you going to use? How many of each do you need?
Here is one way of building a program to get to the treasure chest:
- Select the ‘Move Forward 1 square’ action block, and then select the ‘+’ button at the end of your program three times. So, now you have three ‘Move Forward 1 square’ in a row.
- Select the ‘Turn Right 90 degrees’ action block, and then the ‘+’ button at the end of your program.
- Select the ‘Move Forward 1 square’ action block, and then select the ‘+’ button at the end of your program five times. So, now you have added five ‘Move Forward 1 square’ to your program.
- Select the ‘Turn Left 90 degrees’ action block, and then the ‘+’ button at the end of your program to add.
- Select the ‘Move Forward 1 square’ action block, and then select the ‘+’ button at the end of your program two times. So, now you have two ‘Move Forward 1 square’ in a row.
Learners can play their program as they are building it to test out different parts of it. However, make sure to press the ‘Refresh’ button before playing their program to take their submarine back to its original starting position.
A script to say to learners:
Before you play your program, select the ‘Refresh’ button to take your character back to its starting position. Otherwise, your character will continue from its current location.
Once learners complete their program, they can go ahead and play it to find out whether it takes their submarine to the treasure chest or not. If their submarine reaches the destination, celebrate their accomplishment. If they missed their destination or hit one of the obstacles on their path, encourage them to pause and debug by finding and fixing the action blocks that are causing the problem.
A script to say to learners:
Oh no! We crashed into a shark/jellyfish! It’s common to face some challenges along the way. We can learn how to change things when we don’t get what we had planned. We call this debugging and it’s part of the process. Let’s do some debugging now. Let’s find out which of your action blocks are causing your submarine to go in the wrong direction. How do you want to change our path? You can delete this action block, move it in your sequence, or replace it with another block. Let’s try different options!
How to create repeated patterns (loops)
Learners can use loops to repeat a specific part of their program in Weavly. The action blocks within a loop become the unit to be repeated when played. Learners can specify how many times they want a loop to be repeated without needing to add each action block unit repeatedly. With loops, learners can create repeated patterns and geometric shapes efficiently. They can also create loops within other loops that are called ‘Nested loops’ in programming. With nested loops, learners can create even more complex geometric shapes in Weavly using less steps.
A Loop in Weavly consists of three main parts: Loop start block, Loop End Block, and the Loop content. Each loop has a label made of a combination of alphabet letters that is indicated on both its start and end blocks. On the loop start block, there is the loop counter where learners can enter the number of times they want the loop content to be repeated. Deleting either the loop start or end block will delete both ends of the loop but it does not delete the loop content. If the learner moves the loop’s start or end blocks in their program, the entire loop, including the content, will move in the sequence.
A script to say to learners:
Sometimes you want your character to do the same thing multiple times. You can do this by adding each of those action blocks to your program one by one, which makes your program very long and repetitive. You can also use loops. With loops, you can select a part of your program and tell your character how many times to repeat that part. With loops, you don’t have to keep adding action blocks to your program and you can create cool geometric shapes and patterns.
Using loops to create a square
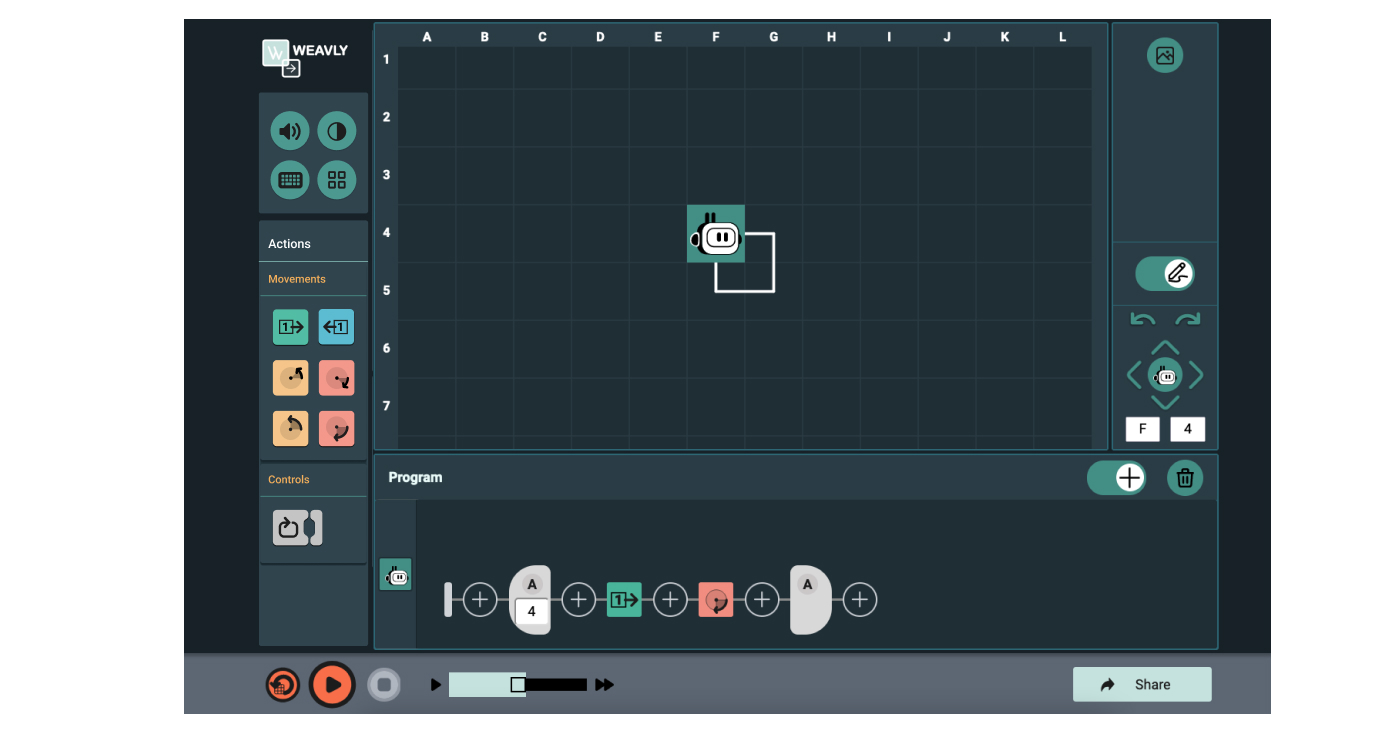
Here is an example of how a square can be created using the least number of action blocks. First, encourage learners to build a square. Once they are done, ask them to look for repeated patterns and count the number of times it has been repeated. Then, ask them to refresh their scene and delete their program, and this time use the loop feature to draw a square.
A script to say to learners:
Let’s try building a square again, except we will use loops this time. Did you notice a pattern when you created a program for a square? Which action blocks are being repeated? How many times are they repeated?
Each side of the square has the same set of action blocks. Let’s delete your program and start from scratch. This time we will use a loop to create a square. With loops, you just need to create one side of your square and then repeat it 4 times, then you will get a square.
Let’s start making a square using loops.
- Add a loop.
- Select the ‘Move Forward 1 square’ action block, and add it inside your loop.
- Select the ‘Turn Right 90 degrees’ action block, and add it inside your loop and after the ‘Move Forward 1 square’.
- Change the number of loops to 4.
- Play your program.
Did you notice how your program has become shorter and more simple than before?
Using loops to create a stop sign
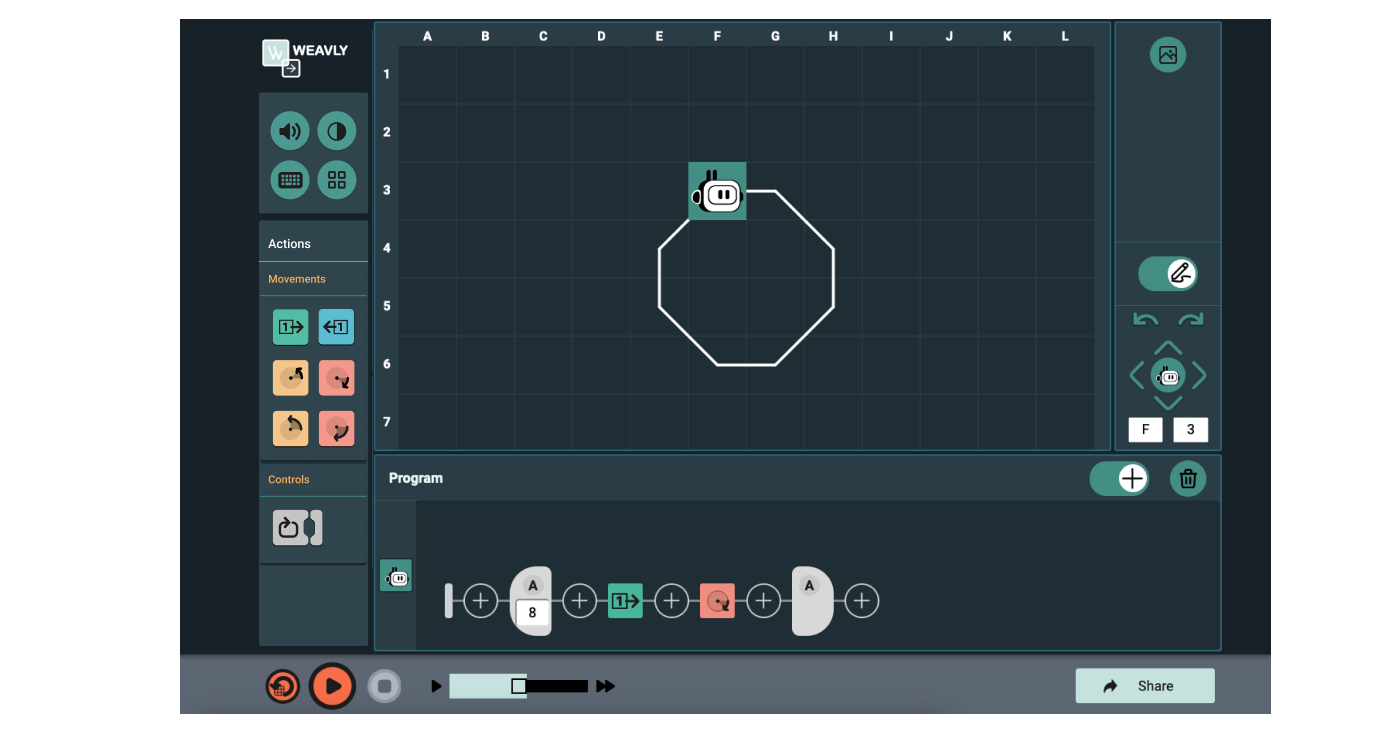
Here is an example of how a geometric shape can be created using the least number of action blocks.
A script to say to learners:
Now that you have learned to use loops to create a repeated pattern for a square, let’s try to create another shape, similar to a stop sign.
- Delete your program and start from scratch.
- Refresh your scene to bring your character to its original position.
- Add a loop.
- Select the ‘Move Forward 1 square’ action block, and add it inside your loop.
- Select the ‘Turn Right 45 degrees’ action block, and add it inside your loop.
- Change the number of loops to 6.
- Play your program.
As you play your program, you may notice that your character runs out of space and hits the edge of the scene and it is not able to draw the shape that you have in your program. Although the default starting position for a character is set at grid cell A2, learners have the option to change this starting position by using the character positioning tools on the panel on the right side of the scene.
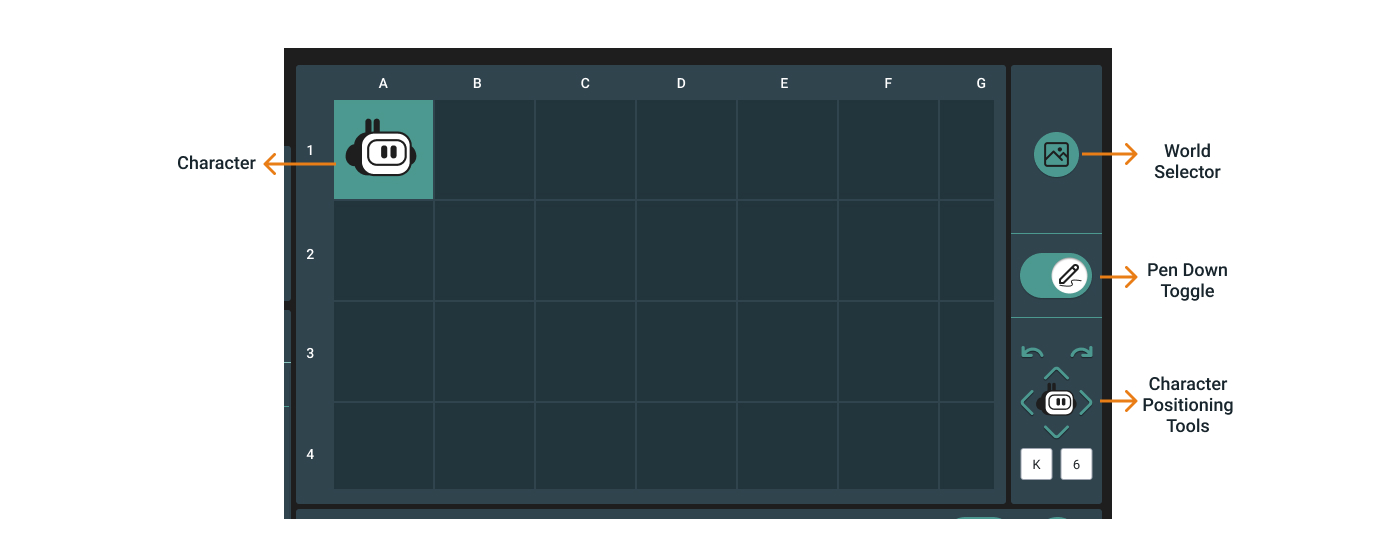
There are two ways to change the character position on the scene:
- Using coordinates to indicate the row and column
- Using arrows to directly move the character on the scene
Once you select the ‘Refresh’ button after playing your program, the character will be placed back in the A2 grid cell. You can use any of the navigation methods to move your character to your intended starting position. This practice ensures the character begins where the learner intended before ‘Play’ is selected.
A script to say to learners:
You may notice your character wasn’t able to draw your shape and began to hit the walls of the scene. To fix this, you can change your character’s starting position. If your character starts somewhere in the middle of the scene, your character will have more room to draw your shape. You can change your character’s starting position in two ways:
- You can enter the coordinate where you want your character to be starting, which means entering the column label and the row number.
- You can use the arrows to move your character to the grid cell where you want your character to be starting.
If you want to take your character back to its initial starting point, then you just need to select the ‘Refresh’ button (left of the Play button) to bring your character back at A2. If this position is not where you want your character to start, then you can change the starting position.
Encourage learners to position their character somewhere in the middle of the scene, such as F3 or F5, and then play their program.
Using loops to create a new geometric shape
The loop feature can allow learners to create more complex geometric shapes and symbols, such as roses, stars, crystals and snowflakes. Here is an example of how other shapes can be used to create geometric shapes.
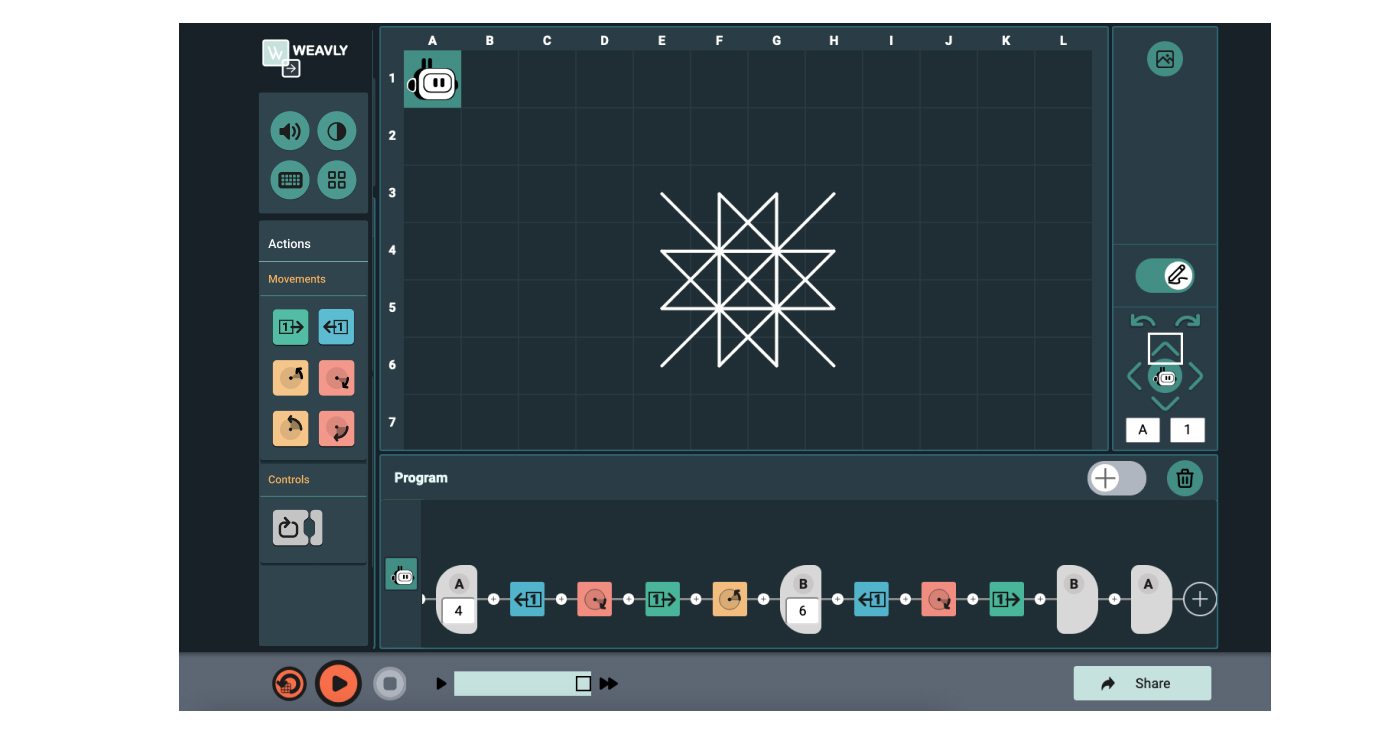
A script to say to learners:
Did you know you can use the loop feature to create special shapes? You can loop any parts of your program to create something entirely different. Now that you have learned to use loops, let’s try to make something different with the program you have created for the stop sign.
- Add 2-3 more action blocks inside your loop.
- Replace one of your turn action blocks with a different kind of turn.
- Select ‘Refresh’.
- Position your character somewhere in the middle of scene, such as F3 or G3.
- Make sure the ‘Pen Down’ is selected.
- Select ‘Play’.
- Once your program finishes running, adjust the number of times you want it to loop.
- Move your character to a different starting position.
- Play your program.
A script to say to learners:
You can also add a loop inside your other loop to repeat a part of it. This extra loop will help you create more exciting shapes with repeated patterns. Let’s continue working on your previous program and try creating loops inside loops, or as programers call it “Nested Loops”.
- Add a loop within your loop.
- Use the edit menu to move your nested loop to the place you wanted to be within the loop.
- You can either add 2-3 action blocks inside your nested loop or use the action blocks edit menu to move existing action blocks inside the loop into the nested loop.
- Refresh your scene.
- Position your character back at F3 or G3 and run your program.
Looking for more challenge?
If learners are becoming more comfortable using these features, here are some activities for further challenge:
- Get them to use loops to draw a staircase with 5 steps
- Try the available scene backgrounds and create different missions for learners to complete
- Get them to build programs to draw specific shapes, such as triangles